 |
| Screencasting: audio works... |
Audacity
I need to post-process audio that was recorded as part of my video takes, as well as in my little home studio. Luckily, there is a great open source tool for both recording and post-processing audio: Audacity. You can use it on Linux, Mac, and Windows. And you don't need to shell out huge sums of bucks just to be allowed to use software for a year. Audacity doesn't cease to work because you didn't pay the next year's rate.
Alas, in audio post-production I regularly...
- first reduce move the room and microphone noise from the raw audio recordings,
- next do level normalization (to -10db),
- and after that I remove unwanted breathing noise that got recorded too.
- Those takes recorded with a Shure Lavalier CLV (yeah, that's an entry speaker lavalier mic...) then need to undergo the equalizer effect in order to compensate the mic's not exactly neutral frequency response.
Install Helpful Audacity Plugins
While Audacity right out of the box comes with an incredibly well-working noise reduction tool, it lacks a noise gate. We'll later use the noise gate for removing breathing noise.
Installing the missing noise gate plugin is easy:
- Either download the noise gate plugin directly or alternatively go to the noise gate plugin page, then download it from there. Store the plugin file into Audacity's plugin directory:
- On Linux, download the plugin file into ~/.audacity-data/Plug-Ins/ (that is, inside your home directory).
- Start Audacity
- Next, select from the menu Effect > Manage...
- In the Plug-in Manager that appears, scroll down to the «Noise Gate» plugin; select it; then press the «Activate» button.
1. Reduce Room & Mic Noise
Of course, the best thing to do is to avoid any unwanted noise in the first place when recording audio. However, often you can't avoid a certain low level of room and microphone noise. Of course, a quality studio mic, such as a large-diaphragm condenser microphone, helps cut down self noise. For example, I'm using the redesigned Røde NT1 that produces very pleasing results (but your liking may vary, since the NT1 does hardly any audio «coloring»).
Unfortunately, there are situations where you can't use these studio beasts: for instance, when shooting video footage outside a studio setup. For instance, I like to use a Shure Lavalier radio mic in many non-studio situations, but those conveniently tiny Lavalier mics come at the price of more noise and audio coloring. Also, studio setup may not be perfect, so there may be a «silent» computer fan, another «silent» NAS fan, as well as other sources of tiny, tiny noises ... that kind of noise that likes to directly creep right into your highly sensitive studio mic.
Luckily, Audacity has a really decent denoiser. It won't remove your noisy neighbor or the ringing cell phone that ruined your take. These recordings you will need to redo, I'm afraid.
In order to reduce noise in your audio, you'll need to teach the noise reducing effect what your noise looks like. For this, you should always record a few seconds of plain room noise. I'm typically recording around five to ten seconds just for this purpose to get the room noise reference.
Then load your dedicated room noise recording or another take with some seconds of undisturbed room noise into Audacity and select a suitable region using the mouse. Next, select from the menu Effect > Noise Reduction...
 |
| Noise reduction in Audacity |
Now click on the big friendly button at the top, labelled «Get Noise Profile». Done, the dialog will dispear.
Now do Edit > Select > None, next Effect > Noise Reduction... once more. This time, we want to actually reduce the noise in the audio take. You may probably need to tune the settings depending on your particular situation. I'm having good results for both my studio mic as well as the lavalier mic using these settings:
- Noise reduction: 17db (so that's -17db)
- Sensitivity: 6
- Frequency smoothing: 6 bands.
Noise reduction in my projects is typically around -17db. This isn't excessive, yet ensures that the noise floor after noise reduction will be lovely low.
Using these settings I was able to basically «remove» the noise from the Lavalier mic takes with really satisfying results. In a much more tough test I used my really sensitive studio mic in combination with a fan-equipped LED studio light (try to get one without a fan and without bleeding through your nose at its price), then removed the fan noise without any noticeable quality loss in the voice recording. But then, my ears may be deaf.
2. Normalize
Next comes audio level normalization. For my simple requirements, I can get away with simply the normalization effect that comes with Audacity. Make sure that no region is selected, then do Effects > Normalization...
In the dialog that then appears simply set the level to -10db. Click on Okay. Done. Please note that normalization takes roughly the loudest part as reference. If you happen to have audio recordings with warying speaker dynamics, you'll need to compress first.
3. Remove Breathing Noise
I'm surely not alone in that I tend to produce unwanted breathing sounds during recording sessions. Fortunately, if your breathing is on the not-too-extreme side of noise, Audacity again comes to our rescue.
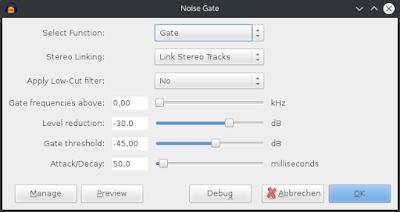
It's time for the Noise Gate plugin. Unfortunately, it's slightly difficult to find: in the Effects menu, you'll see at its very end a set of menu items in form of Plug-ins X to Y. Depending on how many additional effects you have installed, there can be only two or many more of them. As all additional plug-ins get sorted alphabetically look for the Noise Gate... plugin.
 |
| Noise gating in Audacity |
After you've found it, you should see the dialog above. Select a suitable gate threshold to remove remaining noise as well as the usual breathing. If you set the threshold too high, you will remove parts of your voice. For those noisy breathing, later remove the particular regions using the silence generator.
Next, set the level of reduction of those parts that are below the gate threshold.
As for the opening and closing time of the gate (called attack/decay), you may need to experiment. I typically use rather short settings here, in order to remove breathing directly in front of the next spoken words. If the gate is too slow, you end up with cutting into the spoken words which you want to preserve. For me, 50ms has turned out to be a good setting.
4. Equalizer
Since I like to record my real-video takes wearing a radio Lavalier microphone, the audio from this type of mic sounds slightly thin. Fortunately, these audio recordings can be polished in post. That's an almost perfect book example of using an equalizer effect, albeit with caution.
 |
| Frequence response of Shure CLV lavalier mic (source: Shure CLV user guide). |
So with my particular equipment I need to compensate for especially the lack of lower frequencies, as this mic is optimized towards speech. While this is great for presentations especially in potentially noisy environments, the resulting audio lacks some body for my purposes. Well, I could get a different mic. Of I can get away with the equalizer.
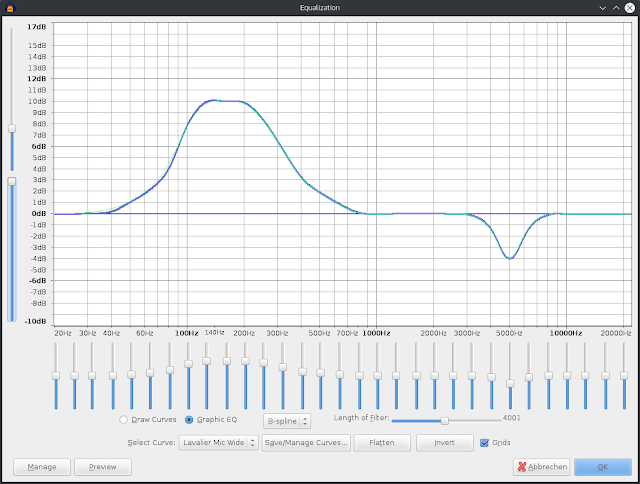
 |
| Audacity equalizer settings suitable for my Shure CLV uses. |
The main point here is: my settings should give you just the idea of what to do in such situations. You'll need to find out your own specific settings necessary in your recording situations, and your settings may differ considerably. Take this as a starting point.
The overall idea here is to compensate for the mic's higher sensitivity especially around 6kHz. On the other hand, I need to emphasize the lower frequencies around 100-200Hz, where the mic's response is slightly weaker.
In case you wonder why the equalizer settings aren't the inverse of the mic frequency response: there's also an audio radio link in between with an audio signal processor towards my mix desk.
That's it!
You will surely rapidly gain experience in polishing your audio recordings. In my case I remastered my first few screencast projects with the exprience gained over time. I simply put my audio files through my improved post process and then rendered the projects anew. Quite a difference and worth the effort.