Multi-Track Video Composition
 Users that have finally mastered typical starter Kdenlive topics such as titles often get stuck as soon as they have two or more main video clip tracks (not counting title tracks or even multiple title clips) with dissolves, et cetera. The thing to slowly master in Kdenlive are transitions and how they can be combined in a non-linear non-layer fashion.
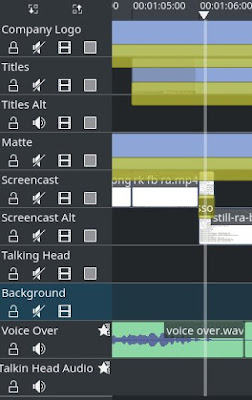
In the screenshot to the right you can spot this situation at the position of the timeline cursor: a dissolve transition combines two video clips on tracks «Screencast» and «Screencast Alt».
Of course, that's simple to do. So let's throw in more real project demands. First, there's the usual company logo on the topmost track that typically needs to be present all the time. Even correctly across dissolves, and so on.
So the company logo clip stretches across your whole project. And you don't want to cut it down just to adjust the transition in individual sections. Imagine then needing to insert some clip somewhere rendering all your cuts useless.
Next comes a title clip in form of a bar across the bottom of the video. And then there's even a matte clip that shades some part of the video clips in order to make viewers focus on the main parts of what is shown. Both clips need to stretch across your dissolve on the next two lower screencast track clips.
Now, how do we do this in Kdenlive? In particular, to which track should all these three transitions above the dissolve transition actually point to? Clearly not the top screencast track ... but the bottom-most video track?
The Empty Track Trick
The important Kdenlive trick to learn here that may save you a lot of rework later:
Always add an empty video track as the bottommost video track to all your Kdenlive projects. Then set the transitions(*) to point to this lowest (empty) track instead of your video clips -- unless you need a different compositing tree.
(*) optionally except the matte track clip.
When you set a transition to point to an empty track then MLT actually walks up the track stack to find a track that is not empty ... and which is not the track with the transition itself
Technically, you don't need the empty track. You can simply wire up all related transitions to point to the bottom-most non-empty track. However, if at some later time in your project you need an additional track at the bottom ... then the empty track immediately pays off. Just insert the necessary additional video track above the empty track.
Without the empty track you will need instead to revisit and check all transitions in your project and rewire them whenever necessary. This may be a time-consuming and error-prone trask. So better start right off with the empty track.
Take some time to toy around with this trick to learn how it behaves. Of course, you can use this trick also higher up the tracks stack; in fact, there's no other way to set up certain composition trees in Kdenlive/MLT than using empty tracks.
The Not-So-Empty Track
Occasionally you may want also to place a black color clip on your (not any longer) empty track; you'll need this whenever dealing with alpha-controlling transitions, such as fading in and out (composite) titles.
The reason is that alpha operations need another clip to combine with ... and if there is no other track than the empty track, then you need to place a black clip onto the not-so-empty track.
More Read...
For more background information please see this first post in a series of three posts on Kdenlive Timeline Illustrated, Part 1.
